Difference between revisions of "EShapeoko 1.2 Assembly: V-wheels"
Jump to navigation
Jump to search
(Created page with "{{Dual-bearing V-wheel Assembly}} Repeat 16 times (single X rail) or 20 times (dual X rail). == Go To == * Next step: [[EShapeoko 1.2 Assembly: smooth idler wheels|smooth id...") |
|||
| (One intermediate revision by the same user not shown) | |||
| Line 1: | Line 1: | ||
| + | The parts for this step are in Packs 1 and 2. Make sure you use the precision washers (EM-W5P) from Pack 1, not ordinary washers from other packs. | ||
| + | |||
{{Dual-bearing V-wheel Assembly}} | {{Dual-bearing V-wheel Assembly}} | ||
| Line 4: | Line 6: | ||
== Go To == | == Go To == | ||
| − | * Next step: [[EShapeoko 1.2 Assembly: | + | * Next step: [[EShapeoko 1.2 Assembly: Smooth idler wheels|smooth idler wheels]] |
| − | * Previous step: [[EShapeoko 1.2 Assembly: | + | * Previous step: [[EShapeoko 1.2 Assembly: Prep work|prep work]] |
| + | * Back to [[EShapeoko 1.2 Assembly Instructions|assembly top page]] | ||
Latest revision as of 23:03, 11 June 2014
The parts for this step are in Packs 1 and 2. Make sure you use the precision washers (EM-W5P) from Pack 1, not ordinary washers from other packs.
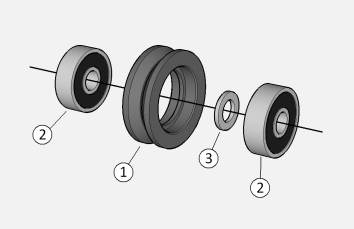
| Item | Part Number | Part Description | Count |
|---|---|---|---|
| For each wheel | |||
| 1 | MW1 | V-wheel sleeve | 1 |
| 2 | G5 | 5 × 16 × 5 mm bearing | 2 |
| 3 | W5Pa | 5 mm precision washer | 1 |
Lay one bearing on a flat surface. Push a V-wheel sleeve over it. The parts are designed to force-fit, so push firmly straight down. Thread this on a long M5 bolt, bearing side first, followed by a precision washer and the second bearing. Place the second bearing on a flat surface, and push the V-wheel sleeve over it too. Make sure both bearings are in as far as they will go. Remove the bolt.
If the V-wheel does not rotate smoothly, see Troubleshooting.
Repeat 16 times (single X rail) or 20 times (dual X rail).
Go To
- Next step: smooth idler wheels
- Previous step: prep work
- Back to assembly top page

