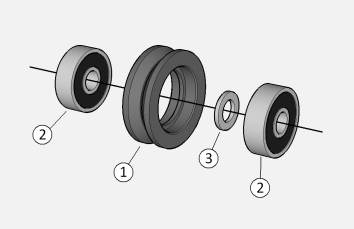
This is a dual-bearing acetal (Delrin) V-wheel for the MakerSlide system.
You can choose to buy the V-wheel sleeve on its own, or you can add:
- One precision shim washer;
- Two 5 mm × 16 mm × 5 mm bearings;
- Fasteners:
- One M5 × 30 mm hex socket cap screw;
- One 6.35 mm (1/4") nylon spacer;
- Four M5 washers;
- One M5 nut.
The "complete" option includes all of the above.
The V-wheels run along the rail part of the MakerSlide. They have very low runout: they are wobble-free, and very sturdy.
The wheels need to be mounted on a carriage (steel/aluminium/plastic plate). The standard configuration would be to have three or four wheels per carriage; two wheels would be fixed in position with a M5 bolt, the other(s) would be adjustable via eccentric spacers. The distance from centre to centre for two wheels to run on a piece of MakerSlide is 64.6mm. One of the mounting holes needs to be 5mm (for the fixed wheel) and the other needs to be 7.14mm (9/32" or 0.281") for the eccentric spacer. When mounting the wheels, the eccentric spacer can be positioned on the inside or outside of the carriage plate. If positioned on the inside, 1/4" spacers are needed on the fixed wheels. Once assembled, adjust the eccentric spacer so that the wheels are the widest distance apart, then slide the carriage onto the MakerSlide. This is to prevent the sharp edge of the rail from damaging the V-wheel during insertion. In the situations when there is a choice (horizontal rail with the Vs in the vertical plane), it is a good idea to have the weight rest mostly on the non-adjustable wheels. Using an 8 mm spanner, adjust the position of the eccentric spacer until the desired tension is reached. The wheels should be tensioned moderately; they should not be as tight as to impede the movement of the carriage significantly, nor as loose as to wobble. Take into account the strength of your carriage material too: if using something flexible, such as acrylic sheet or a 3-D printed part, the carriage could bend if the eccentrics are over-tightened.
In a setting with lots of debris, such as a CNC milling machine, routinely check the rail and the inside of the V of the wheel for debris build-up. Remove it using, for instance, an old toothbrush. Bupms in the movement of the carriage (felt best if moving it by hand) are usually debris on the wheel or the rail, or, more rarely, slight dings or notches.
Here is the technical drawing for the V-Wheel.
Assemble the V-wheels

| Item |
Part Number |
Part Description |
Count |
| For each wheel |
| 1 |
EM-MW1 |
V-wheel sleeve |
1 |
| 2 |
EM-G5 |
5 x 16 x 5mm bearing |
2 |
| 3 |
EM-W5P |
5mm precision washer |
1 |
Lay one bearing on a flat surface. Push a V-wheel sleeve over it. The parts are designed to force-fit, so push firmly straight down. Thread this on a long M5 bolt, bearing side first, followed by a precision washer and the second bearing. Place the second bearing on a flat surface, and push the V-wheel sleeve over it too. Make sure both bearings are in as far as they go. Remove the bolt.


