Difference between revisions of "EShapeoko 1.0 and 1.1 Assembly Instructions"
m |
|||
| Line 34: | Line 34: | ||
on a flat surface, and push the V-wheel sleeve over it too. Make | on a flat surface, and push the V-wheel sleeve over it too. Make | ||
sure both bearings are all the way in. Remove the bolt. | sure both bearings are all the way in. Remove the bolt. | ||
| + | |||
| + | [[File:EShapeOko_assembly_step_01_V-wheel_2.png]] | ||
Repeat 16 times (20 if you have the dual-X upgrade). | Repeat 16 times (20 if you have the dual-X upgrade). | ||
| − | + | == Step 2: Assemble the smooth idler wheels == | |
| − | + | [[File:EShapeOko_assembly_step_02_idler_wheel_1.png]] | |
{| class="wikitable" | {| class="wikitable" | ||
| Line 65: | Line 67: | ||
|5mm precision washer | |5mm precision washer | ||
|} | |} | ||
| − | |||
| − | |||
Lay one bearing on a flat surface. Push an idler wheel sleeve over it | Lay one bearing on a flat surface. Push an idler wheel sleeve over it | ||
| Line 74: | Line 74: | ||
second bearing on a flat surface, and push the idler wheel sleeve over | second bearing on a flat surface, and push the idler wheel sleeve over | ||
it too. Make sure the bearings are all the way in. Remove the bolt. | it too. Make sure the bearings are all the way in. Remove the bolt. | ||
| + | |||
| + | [[File:EShapeOko_assembly_step_02_idler_wheel_2.png]] | ||
Repeat 6 times. | Repeat 6 times. | ||
| − | |||
| − | |||
== Step 3: Mount the V-wheels on the right Y panel == | == Step 3: Mount the V-wheels on the right Y panel == | ||
Revision as of 14:09, 26 October 2012
Step 1: Assemble the V-wheels
| Item | Count | Part Number | Part Description |
|---|---|---|---|
| For each wheel | |||
| 1 | 1 | EM-MW1 | V-wheel sleeve |
| 2 | 2 | EM-G5 | 5 x 16 x 5mm bearing |
| 3 | 1 | EM-W5P | 5mm precision washer |
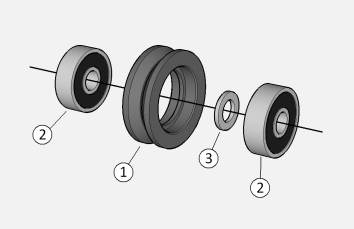
Lay one bearing on a flat surface. Push a V-wheel sleeve over it. The parts are designed to force-fit, so push firmly straight down. Thread this on a long M5 bolt, bearing side first, followed by a precision washer and the second bearing. Place the second bearing on a flat surface, and push the V-wheel sleeve over it too. Make sure both bearings are all the way in. Remove the bolt.
Repeat 16 times (20 if you have the dual-X upgrade).
Step 2: Assemble the smooth idler wheels
| Item | Count | Part Number | Part Description |
|---|---|---|---|
| For each wheel | |||
| 1 | 1 | EM-MW2 | Smooth idler wheel sleeve |
| 2 | 2 | EM-G5 | 5 x 16 x 5mm bearing |
| 3 | 1 | EM-W5P | 5mm precision washer |
Lay one bearing on a flat surface. Push an idler wheel sleeve over it (lip up, of course). The parts are designed to force-fit, so push firmly straight down. Thread this on a long M5 bolt, lip side first, followed by a precision washer and the second bearing. Place the second bearing on a flat surface, and push the idler wheel sleeve over it too. Make sure the bearings are all the way in. Remove the bolt.
Repeat 6 times.
