Difference between revisions of "EShapeoko 1.2 Assembly: X carriage"
Jump to navigation
Jump to search


| Line 4: | Line 4: | ||
Take a deep breath... | Take a deep breath... | ||
| − | [[File:EShapeoko 1.2 assembly X carriage front.png|frame|none|Front | + | [[File:EShapeoko 1.2 assembly X carriage front.png|frame|none|Front and middle of the X carriage]] |
| − | + | [[File:EShapeoko 1.2 assembly X carriage rear.png|frame|none|Rear of the X carriage]] | |
PARTS TABLE | PARTS TABLE | ||
Revision as of 13:24, 2 July 2014
For this step, you will need the fourth motor plate, the rear X motor plate with the motor and idlers attached from two steps ago, and the remaining parts in Pack 5.
Take a deep breath...

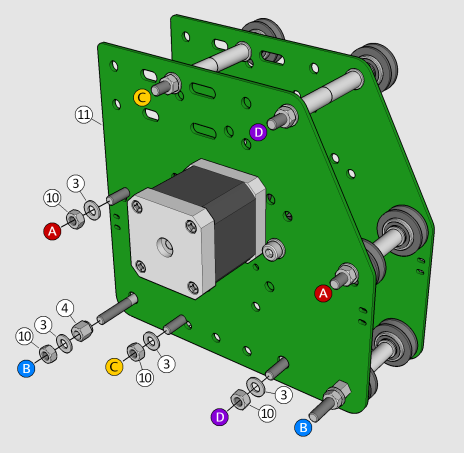
Front and middle of the X carriage

Rear of the X carriage
PARTS TABLE

Position of V-wheels on the X carriage, as seen from the front (red: fixed X V-wheels; blue: adjustable X V-wheels; yellow: fixed Z V-wheels; purple: adjustable Z V-wheels)
INSTRUCTIONS
Part 5 (shown in orange) is EM-W5B (form B M5 washer), which is thinner (0.75 mm) than the regular washers (0.95 mm). The thinner washers are packed in a separate bag, because they are otherwise hard to tell apart (they are not painted orange in real life). It is important to get the spacing of the X V-wheels exactly right, to match the distance between the Vs of the MakerSlide, so please be careful to use the correct washers.
LINKS