EShapeoko 1.2 Assembly: X carriage
Jump to navigation
Jump to search


For this step, you will need the fourth motor plate, the rear X motor plate with the motor and idlers attached from two steps ago, and the remaining parts in Pack 5.
Take a deep breath...

Front and middle of the X carriage

Rear of the X carriage

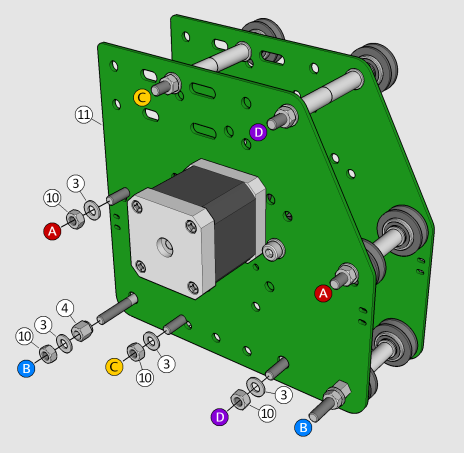
Position of V-wheels on the X carriage, as seen from the front (red: fixed X V-wheels; blue: adjustable X V-wheels; yellow: fixed Z V-wheels; purple: adjustable Z V-wheels)
| Item | Part Number | Part Description | Count |
|---|---|---|---|
| 1 | EM-S5-70 | M5 70mm cap screw | 2 |
| 2 | EM-S5-90 | M5 90mm cap screw | 6 |
| 3 | EM-W5 | M5 washer (form A) | 48 |
| 4 | EM-MES | Eccentric spacer | 6 |
| 5 | EM-W5B | M5 washer (form B) | 8 |
| 6 | Assembled V-wheel | 12 | |
| 7 | EM-D5-16a | M5 25.4mm spacer (thick) | 12 |
| 8 | EM-D5-04a | M5 6.35mm spacer (thick) | 2 |
| 9 | EM-LMP | Motor plate | 1 |
| 10 | EM-N5 | M5 hex nut | 8 |
| 11 | Assembled rear X motor plate | 1 |
Part 5 (shown in orange) is EM-W5B (form B M5 washer), which is thinner (0.75 mm) than the regular washers (0.95 mm). The thinner washers are packed in a separate bag, because they are otherwise hard to tell apart (they are not painted orange in real life). It is important to get the spacing of the X V-wheels exactly right, to match the distance between the Vs of the MakerSlide, so please be careful to use the correct washers.
TO DO: DETAILED INSTRUCTIONS
Go To
- Next step: TO DO: NEXT STEP
- Previous step: Y carriages
- Back to assembly top page